Hey, sorry I've pretty much fell off the earth! I'm still around just way busy. Hopefully I'll get something up tomorrow :)
~Stephanie
About Me
- Stephanie
- I'm 18 and LOVE makeup and fashion. I started by posting pictures on Facebook and Twitter but that got annoying, so I started this blog! Email me if you want to make suggestions at cyphers94@aol.com. Just be sure to say its about my blog in the subject line or I might not open it!
Friday, December 16, 2011
Saturday, December 3, 2011
Quick Post: Dark Dramatic Crease
Last night I wore this out and loved how it came out, so I just took a couple quick pictures to put up. I really love the dark, dramatic look using so much black but how it looks wearable for a normal day or a casual night out :) Let me know if you'd like a step-by-step tutorial or I could just leave it like this if this is enough inspiration and instruction for you to use!


Friday, December 2, 2011
First Video! Eye Makeup Collection
Ok I finally made my first video! Sorry if the quality is terrible or whatever but I don't know how to edit well at the moment. Hope you can hear it, you should be able to if you turn your speakers up a little... sorry! Comments are welcome, even if you hate it! Suggestions are welcome and even preferred so please do suggest :) Comment if you want further review on anything, if there's any other products I didn't show you have any questions about, if you want a tutorial on anything... anything! Thanks for watching and I'm SO SORRY its like 20 minutes long. I don't blame you if you can't sit through it all. Excuse the bloopers, I cant edit haha. Thanks :)
~Stephanie
~Stephanie
Tuesday, November 29, 2011
Natural Eye
Sorry I have been so bad about posting :( I made a quick eye look for you guys just so I could get back into posting and make a tutorial. This look is much more simple than my past looks and is more for those who aren't as makeup-adventurous or it's not appropriate for you to wear to school/work. Enjoy :)


Apply an eyeshadow base then an eyeshadow nearly the same shade as your skin tone.

Place an eyeshadow in the crease all the way up to the brow bone (just below where you will put a highlight color) that is a shade or two darker than the first shadow and blend well

Using another brown color a couple shades darker than the crease, blend a small amount in the outer corner to add some depth.

Highlight the brow bone and inner corner with a light cream color or even a white whatever looks best for you that is a few shades lighter than your skin.

Line your upper lashes and the outer corner of your lower lashes with the darkest color you used so far (the outer corner medium-dark brown) with an angled brush.

Apply mascara of choice. A brown would be more in the "natural" category but I only have black.

Products!

All over lid

Crease

Outer corner and upper lash line (the brown)

Highlight

Large fluffy for all over color crease and outer corner. Pencil brush for highlight and angled for lining the upper lashes.

Falsies Flared Mascara- black
So this is super natural and not for those who feel they need a load of makeup to feel comfortable. On the other hand for the people who think my past looks were too wild, this is for you! Hope you enjoyed and let me know what you think :) I'll try to start my series soon, I just need to check the votes. Thanks for reading!
~Stephanie
Thursday, November 24, 2011
So Mad!!!!
My camera will NOT work for some reason and I'm trying so hard to make a video but I can't get it to work.
SO MAD.
~Stephanie
SO MAD.
~Stephanie
Sunday, November 20, 2011
Friday, November 18, 2011
Come on Guys!
It makes me sad that there have been 13 views of specifically the Poll post and only 3 people voted!! Come onnnnn just vote! Really if no ones interested I won't waste my time blogging and being annoying continuously posting on facebook lol. So vote please, and be involved, its not that hard to type, you're clicking on the page so obviously you wanted to see :)
~Stephanie
~Stephanie
Kathlyn's Makeup
My friend asked me to do her makeup and I'm really happy with how it came out :) I did a kind of smoky brown fading into gold and a lot of highlight. I'll post pictures now and put up the directions later!


To create the eye look, I started with Too Faced Shadow Insurance in Lemon Drop. Then, I applied a light vanilla-y shade all the way from lashline to browbone. With an angled brush I lined her top lashes with a brown cream liner and then smudged it up on the outer corners. I used a medium-dark brown eyeshadow over that liner and worked it up into the crease, about halfway in on then eye. With a very dark brown shimmer (Urban Decay Twice Baked), I did the outer corners and a little bit in the outer part of the crease. Using a gold shimmer (Urban Decay Half Baked) I covered the rest of the lid and blended it into the edge of the brown. Finally, using the NYX Jumbo pencil in Milk, I went just below the brow bone, blended that in, and put a very light, nearly white matte in top of that and in the inner corners for highlight. Topped this off with a teeny smudge of brown cream liner under the bottom lashes and some Falsies mascara! Done :)
For the whole face, I used Bobbi Brown Foundation in Sand, Bare Minerals Mineral Veil, Milani Baked Blush in Luminoso and the lighter bronzer in the Colorista Palatte (mentioned below).
Sorry about just color descriptions for a lot of these, but many of the colors are from my Sephora Colorista Palette (I'll show that in my makeup bag video!!) but unfortunately that palette has been discontinued :(
Monday, November 14, 2011
Poll!
Ok I'm officially starting a weekly series, even if it kills me. That will keep me honest and on track with updating so you guys don't get bored and stop looking at my blog. So please comment on this, more input is better!
What would you rather see for the series?
1. Landscapes (ocean, desert, etc.)
2. Decades (50's, 60's, etc)
Please chose one or the other, most votes obviously will be the series :)
Easy directions on commenting if you can't find it:
-Click where it says "0 comments" (or however many comments there are at the time) right below the end of the writing for this post
-Type your comment
-When you need to chose a profile, at the bottom of the drop down menu you can chose to be anonymous or just type your name
Thursday, November 10, 2011
Quick Review: Milani Baked Blush in Luminoso
I've heard great things about this blush, and since they sell Milani products at my local Walgreens, I had to try it! This is supposed to be a dupe or knockoff for the NARS blush in Orgasm and comparing pictures of the two, I can definitely say its about the same! Now to be honest, I've never tried the NARS one so I cannot say from experience if this is better, worse, or no different, but I do love this color so it works for me! Its a universally flattering peachy pink with a little golden sheen to it. It appears to have less shimmer than the NARS, which in my opinion is good because natural faces don't shimmer. The Milani blush cost me about $8, where as the NARS is $27 so I think that for how similar they seem, this is the blush for those of us on a budget!

Nice looking package, not cheap or flimsy

Decent amount of product for your money

Subtle, but glowy and pretty

Not too in-your face but still adds a nice bit of color :)
Overall I really like this blush! The one downfall I see is that it does apply heavy if you're not careful, so use a light hand when applying or use a fluffy brush afterwards to blend it in better. I find blending after tends to work better for me, but I think that's a preference thing. For almost a quarter of the price of NARS Orgasm and a similar flattering and subtle glow, I think this is very worth it! :)
Monday, November 7, 2011
Urban Decay Friends and Family Inspired Look
I really loved the picture for the Urban Decay Friends and Family Sale, so I stole the girl's look and made it myself! I took a different approach to this tutorial because its a little more complex. Each picture will have the step associated with it, instead of writing it all at the end, so you can really see how its done. let me know if you like this way or the old way better. All products used, including brushes, are at the end for reference. Comments please! :)
 <- ----- The look I'm modeling from


Products Used:


<- ----- The look I'm modeling from
Prime your lid with a primer like Too Faced Shadow Insurance, then Using NYX Jumbo pencil in Milk, cover the entire lid and wing it out to made a solid base for the bright colors. It doesn't need to be neat but it does need to cover all over.

Using a light-medium blue shadow and a tapered brush, work the shadow in the crease and trace over the wing of the white. Leave a space of white in the center of your lid. If it goes too high, wrap a tissue around your finger and wipe away and stray shadow.

With a light-medium purple color, pat the color with a small flat brush on the white part in the center of your lid. I mixed 2 colors, so you can get creative and make your own shades if you don't have exactly what you want.

Outline the entire blue area, including the wing, lightly with the NYX jumbo pencil to define the area.

Blend it in and up onto the brow for a highlight. Here, you can also add a darker blue in the outer crease for some contour, I forgot to add a picture of the product but I'm sure you get the idea!

Add a thin line of back eyeliner to the top lid and line the waterline too. Too thick will take over the color, so be careful!

Add mascara of choice.

You can also put more NYX jumbo pencil where you see fit, like the inner corner to brighten it up. Also, you can pat a sheer shimmer on is you want. Eyes done!

The model had a really red lipstick with a hint of orange, but I don't own that, nor does it look good on me. I went pink instead!
Completed Look:


Products Used:

All over shimmer brush, tapered brush, small flat brush, lip brush

Too Faced Shadow Insurance, NYX Jumbo Pencil in Milk, Urban Decay 24/7 eyeliner in Zero

Light-medium blue for crease and majority of eye
Mixed these 2 purples for center of the eye


Lip Color (looks so red but it came out very pink!)
So that's the completed look! I want to start the series soon but no one's given me feedback about it. If no one wants it I won't bother! Any questions or comments are welcome and appreciated :) If I was unclear in this, tell me! I'll explain further if you want. Thanks blog followers!! :)
~Stephanie
Friday, November 4, 2011
Blue Nails
Dark blue is a big nail trend for Fall/Winter 2011 so I decided to make something of it beside a boring flat nail color. I added wispy design! Here's some pictures :)


My freakishly long fingers!

Toes!
Its kind of hard to describe how to do this, but you can probably figure it out from the picture. I used Sinful colors Midnight Blue as the base and Sinful colors Bad Chick white nail polish (the kind that comes with the thin nail art type brush) for the design. Just start in the corner and wisp the brush out as many times as you want to achieve this look, or do something else like stripes or polka dots! :)
Videos? Themes?
So just a quick poll, you can answer in the comments below. This is especially good for people who view my blog recently and will hopefully get more frequent viewers!
1. Should I start doing videos or is it easier for me to type out the instructions like I have been?
2.Do you like the geography-like theme or do you have better ideas? I need help naming it!!
I'll do videos once a week for those if you guys want or just keep typing the directions like I have been. Looking forward to some comments, no one does and I'm trying to get some conversation going, it will make the blog better I promise :)
Thursday, November 3, 2011
Comments!! :D
I found the comment setting so i think everyone can comment now! Yay! More feedback= better posting so let me know what you think of everything I post, even if you hate it! :) Just click where it says the # of comments for that post and write your comment there.
~Stephanie
~Stephanie
Urban Decay Friends and Family Sale

Urban Decay is holding their holiday friends and family sale, 20% off everything! This includes the Naked palette and other Naked brand things by Urban Decay, which are usually excluded from the sale. This is a great opportunity if you've been thinking about buying from them and you should definitely take advantage of it! Check back soon I think I'm going to start my new series soon but I'm still having a hard time naming it. Geography sounds boring.... give me suggestions please! Facebook message me, email me, whatever :) Keep in mind outer space is one of the potential themes, so it can't be places on earth. The rest of the themes I'm keeping a secret and will be a surprise every week :D
~Stephanie
Wednesday, November 2, 2011
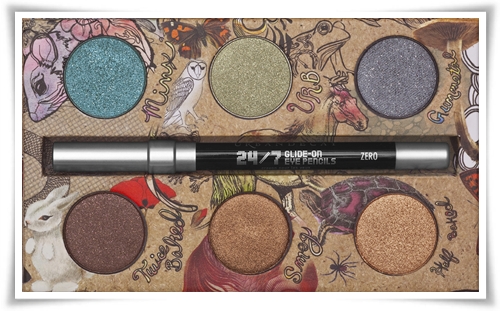
Urban Decay Vegan Palette Review
Here's the long awaited review of the Urban Decay Vegan Palette! Sorry I took so long but I've been so busy... at least it was only a week delayed! I'll stop talking and start showing pictures now :) The camera makes some of the colors a teeeeny bit more intense, but these are pretty accurate.


 Thanks so much loyal blog stalkers :)
Keep checking back and spreading the word! Hopefully I'll relocate this soon so you guys can comment. Contacting me by Email or Facebook is still great and highly appreciated! Tell me what you think about my series I'm thinking about. (details below in my last post)
~Stephanie
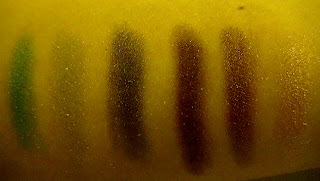
Left to Right: Minx, Urb, Gunmetal, Twice Baked, Smog, Half Baked
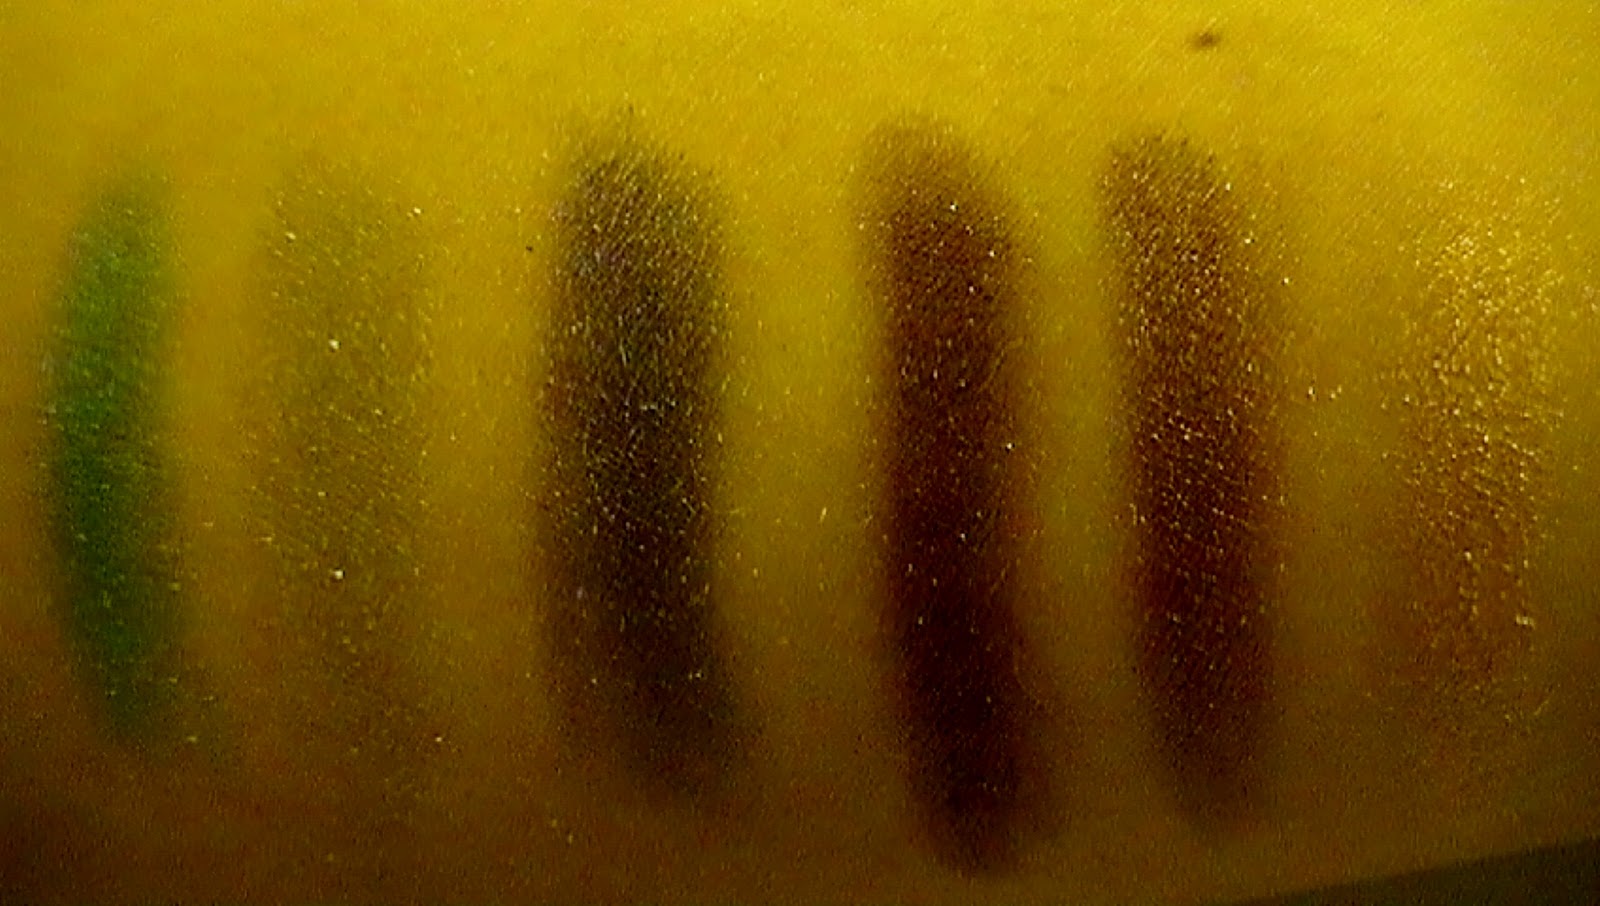
No base- I think these colors stand very well alone, especially if you want a more subtle, muted color or a pastely effect.

With Too Faced Shadow Insurance as Base- this is how I wear them and these colors have some pretty AWESOME payoff, especially the browns and gold. The blue (Minx) and green (Urb) were a little disappointing in their intensity.

With white eyeliner base- even more awesome!! The blue (Minx) and green (Urb) definitely work better with the white, but the gold (Half Baked) and medium brown (Smog) seem to look less shimmery and pigmented.
Overall I was VERY impressed with this palette. Lately I've been using it literally every day because the colors are so versatile but can also be really intense for a night look. My two favorite colors are definitely the dark gray (Gunmetal) and the gold (Half Baked). So far the medium brown (Smog) has proven hard to wear because of the color. I wore it today and as of now I look like I got punched in the eyes, but maybe it's because I was rushed this morning or am sick; I definitely need to give it another chance! The blue and green are kind of sad without the white, so I'd suggest white if you have this and want it to be more BAM like I do :) This set is a great deal because of these amazing colors, the eyeliner (which I'm also loving, works great on the waterline, makes a good dark black and is long-wearing), and the Primer Potion that I may end up cheating on Too Faced with! Unfortunately, this is no longer on Urban Decay's website, I think they may have discontinued it because I bought it on sale. There's some on Amazon I saw but they're a little pricey. This is what it looks like if you want it and see it:
Thanks so much loyal blog stalkers :)Keep checking back and spreading the word! Hopefully I'll relocate this soon so you guys can comment. Contacting me by Email or Facebook is still great and highly appreciated! Tell me what you think about my series I'm thinking about. (details below in my last post)
~Stephanie
Monday, October 31, 2011
New Idea
So after I roll around to the U.D. Vegan palette review, I'm thinking to do some kind of tutorial series I post once a week. I was thinking maybeeee like earth's geography and I know that sounds lame but I thought some would be kind of pretty. Themes would be like ocean, mountains, rain forest, etc. Let me know what you think or if you have a better idea. Sorry I didn't get something up for Halloween, I REALLY wanted to do spider webs but I had no time :'(
~Stephanie
~Stephanie
Sunday, October 30, 2011
Thanks Tim!
Just realized, thanks to my my awesome boyfriend's helpfulness (he made me say awesome :P), you guys can't post on here! This website sucks and hopefully I can move my blog soon. For now, emails work fine! cyphers94@aol.com for suggestions, comments, praise, hatred, its all nice :) Thanks, loyal blog stalkers :D
Party Eyes!
This is pretty much an amped-up version of the gunmetal eyes with a little added pizazz: lashes! I went to a party tonight and since I wore a black dress, thought this would look nice. For better instruction about the eyeshadow use, see the "Gunmetal Eyes" post. Sorry I've been pretty lame about posting new things, I justtttt finished all my college applications and I promise I'll be better now :) So here's some pictures, enjoy!


As you can see, this is really really similar to the Gunmetal Eyes!

I added some false lashes and defined my brows with an angled brush and some brown eyeshadow. Then I set them with clear mascara.

To cover up any glue or gaps between the false lashes and skin, use some eyeliner! An eyeliner pen works best because its not as messy as liquid but more fluid than a pencil. Also, it wont ruin the false lashes so you can re-use them.

Dark eyes neeeeeed defined brows! Also, if you don't use some bronzer you'll look pretty gothic, so unless that's the look you want, remember your bronzer!!
As I said earlier, this look is done with the same colors as my Gunmetal Eyes, the only differences are that I used more black, used a shimmery white as a highlight instead of a light skin tone, and of course, the lashes.
To apply lashes, remove them from the package (obviously) and flex them a bit to soften them up. Then, hold them to your eye to see if you need to cut them shorter. Place a small drop of the glue somewhere like on the package and use a Q-tip to spread the glue on the part of the lashes that goes on your skin. Wait 20ish seconds and blow on the glue a couple times before applying so it gets sticker. To easily hold the lashes steady, use tweezers to place them right on top of your natural lashes, then press them in place with your fingers. Wait a couple minutes to let them set and dry, then if preferred, use the liner pen to go oer the edge of the lashes on your skin.
To darken my brows, I used an angled brush and a dark brown eyeshadow, just going with the natural curve of my eyebrows. Of course, you should use whatever color is appropriate to your brow color, unless you want dark. Then, set the hairs using a clear mascara and you're good to go. With a look this intense, a dark lip color might be too much, so keep it simple!!
Again, sorry for being bad about posting. I'll put up swatches and a review of my new palette within the next couple days, I promise!!! :)
Subscribe to:
Posts (Atom)