So after I roll around to the U.D. Vegan palette review, I'm thinking to do some kind of tutorial series I post once a week. I was thinking maybeeee like earth's geography and I know that sounds lame but I thought some would be kind of pretty. Themes would be like ocean, mountains, rain forest, etc. Let me know what you think or if you have a better idea. Sorry I didn't get something up for Halloween, I REALLY wanted to do spider webs but I had no time :'(
~Stephanie
About Me
- Stephanie
- I'm 18 and LOVE makeup and fashion. I started by posting pictures on Facebook and Twitter but that got annoying, so I started this blog! Email me if you want to make suggestions at cyphers94@aol.com. Just be sure to say its about my blog in the subject line or I might not open it!
Monday, October 31, 2011
Sunday, October 30, 2011
Thanks Tim!
Just realized, thanks to my my awesome boyfriend's helpfulness (he made me say awesome :P), you guys can't post on here! This website sucks and hopefully I can move my blog soon. For now, emails work fine! cyphers94@aol.com for suggestions, comments, praise, hatred, its all nice :) Thanks, loyal blog stalkers :D
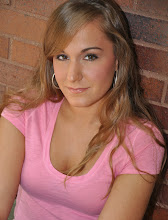
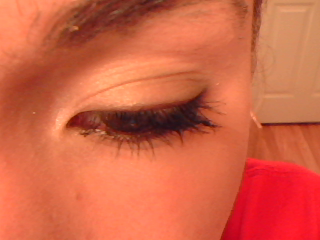
Party Eyes!
This is pretty much an amped-up version of the gunmetal eyes with a little added pizazz: lashes! I went to a party tonight and since I wore a black dress, thought this would look nice. For better instruction about the eyeshadow use, see the "Gunmetal Eyes" post. Sorry I've been pretty lame about posting new things, I justtttt finished all my college applications and I promise I'll be better now :) So here's some pictures, enjoy!


As you can see, this is really really similar to the Gunmetal Eyes!

I added some false lashes and defined my brows with an angled brush and some brown eyeshadow. Then I set them with clear mascara.

To cover up any glue or gaps between the false lashes and skin, use some eyeliner! An eyeliner pen works best because its not as messy as liquid but more fluid than a pencil. Also, it wont ruin the false lashes so you can re-use them.

Dark eyes neeeeeed defined brows! Also, if you don't use some bronzer you'll look pretty gothic, so unless that's the look you want, remember your bronzer!!
As I said earlier, this look is done with the same colors as my Gunmetal Eyes, the only differences are that I used more black, used a shimmery white as a highlight instead of a light skin tone, and of course, the lashes.
To apply lashes, remove them from the package (obviously) and flex them a bit to soften them up. Then, hold them to your eye to see if you need to cut them shorter. Place a small drop of the glue somewhere like on the package and use a Q-tip to spread the glue on the part of the lashes that goes on your skin. Wait 20ish seconds and blow on the glue a couple times before applying so it gets sticker. To easily hold the lashes steady, use tweezers to place them right on top of your natural lashes, then press them in place with your fingers. Wait a couple minutes to let them set and dry, then if preferred, use the liner pen to go oer the edge of the lashes on your skin.
To darken my brows, I used an angled brush and a dark brown eyeshadow, just going with the natural curve of my eyebrows. Of course, you should use whatever color is appropriate to your brow color, unless you want dark. Then, set the hairs using a clear mascara and you're good to go. With a look this intense, a dark lip color might be too much, so keep it simple!!
Again, sorry for being bad about posting. I'll put up swatches and a review of my new palette within the next couple days, I promise!!! :)
Thursday, October 27, 2011
Tell Me What You Want (what you really really want)
Hey so sorry I haven't posted since Monday, I've been having an insanely busy week! Also, I'd really like to know what people want to see because this is for other people to see,enjoy, and benefit from not just me to take pictures of my eye makeup every day haha. So, what do you guys wanna see? Eye makeup, lip stuff, foundation, skincare? I'll tell you I'm much better with eye makeup and I still need to swatch and review my Urban Decay Vegan Palette, but I'm really open to suggestions. Blogs are for the viewers, not the blogger, so give me some input because I know people are seeing this (it keeps track of pageviews) but no one's said a word. No comments and no pageviews means less priority on blogger and no one outside my facebook friends will see this. Sorry to ramble!
~Stephanie
~Stephanie
Monday, October 24, 2011
Gunmetal Eyes
I got my Urban Decay Vegan Palette (as everyone probably knows) and I LOVE it! Soon I'll post swatches of the whole palette so you can see the colors with and without primer! I'm not sure if its still on sale but I think its a great deal. This look was created using one of the six colors and the eyeliner that comes in the palette. Forgot to use the primer but I've used it since I made this look and it's been working out well :) You can amp this look up or tone it down depending on how much black you wanna use. Enjoy!


Its not actually darker in the inner corner, that's just a shadow. Darkening the inner corner makes your eyes appear closer together. Use a light shadow there to make them appear farther apart, depending on if you have close or far set eyes.


Please excuse the bushy brows. I finally got to get them waxed!
Products!

All over lid

Black side only, you could maybe use the light color for highlight if you have more pink based skin, but I have yellow based skin and can't

To create this, I primed my eye with Too Faced Shadow Insurance in Lemon Drop. Then, using the color gunmetal from the U.D. Vegan Palette, I covered my entire lid. Next I used the black half of the L'oreal HIP eyeshadow duo in Dashing on my outer corner, into the crease, and slightly under my eye in the outer corner lash line. Using the U.D. 24/7 eyeliner in Zero I lined my upper lashes and lower water line. Be sure when you do your waterline you keep from blinking as long as you can so the makeup can set better and last longer. As always with a darker look, at least some bronzer is a must. Also, this can easily be a day look like with the small amount of black I used, or night with more black. To "erase" stray black eyeshadow, wipe with a tissue then use a little eyeshadow thats slightly lighter than your skin. This can highlight your brows, get rid of darkness and brighted up your eyes overall. Thanks so much to my loyal readers and spread the word! Suggestions for what you want to see soon would be great :)
Saturday, October 22, 2011
Meteor Shower Eyes
Hey guys! Yesterday I decided to go all out with my makeup for choir rehearsal and make this gorgeous sparkly look. Its fairly simple and only uses a couple different eyeshadows, but its really nice for going out, night time, or whenever you're feeling like sparkles! Here's some pictures :) Just for reference, I'll always put the products used and the how-to at the bottom. Please excuse the yellow tint, I don't know how to fix it but if anyone does please teach me! I think its a lighting problem.


Come back tomorrow and I'll have pictures of my newest Urban Decay shipment with swatches! Thanks and keep spreading the word. Remember, there's no point if no one sees this blog :)

Much nicer pictures than the old camera

I mean, look at that detail!


E.L.F Brown Liquid Liner, Sephora Eyeshadow Trio in Meteor Shower, Urban Decay 24/7 Glide- On Eye Pencil in Zero

I used the top two colors in this eyeshadow, clearly not the blue :)
To create this look, as always, I started with Too Faced Shadow Insurance in Lemon Drop to prep my lids and conceal any discolorations. Then, I used a Wet n' Wild white eyeliner pencil and covered my whole lid as a base to make the gold more vibrant (any white liner will do, I've heard NYX Jumbo Pencil in Milk is best, but I haven't had the chance to buy one). Using a small paddle-style eyeshadow brush, I patted it in the gold color and then pressed, not dragged across my lid, the color into the white all over. This method minimizes fallout with such a loose glittery color. Then , with that same brush, after I wiped some excess glitter off it, I swirled the end in the brown color and created a precise line from my outer corner into my crease halfway to create depth, then blending out the color. For eyeliner I used the E.L.F brown liquid liner on top and U.D. Eyeliner in Zero on my bottom waterline. The U.D. liner stays put all night if you apply a good coat and then don't blink for a few seconds to it set. I finished with the Falsies Mascara in Black and that completed this look :)
Come back tomorrow and I'll have pictures of my newest Urban Decay shipment with swatches! Thanks and keep spreading the word. Remember, there's no point if no one sees this blog :)
Friday, October 21, 2011
Good News :)
I found a better camera in my house! I forgot about the video camera we have that takes pretty nice pictures so I'll be posting with that from now on. You can see the difference in quality in my last post's newest pics, I uploaded product pictures :) Sadly no makeup looks today, I'll be out all night. Maybe I'll put something new up tomorrow!
Thursday, October 20, 2011
Pale Green and Gold Shimmer
So I thought this would be a great autumn look, sort of a changing leaves from green to golden yellow look. In person the colors are far more noticeable but sadly the camera I'm using isn't super high-tech. I really need to be using something better and I apologize for the color quality but here's some pictures from today :)


See? This kind of looks brownish. I'm not in love with this camera
Pretty much, I applied Too Faced Shadow Insurance in Lemon Drop, then patted a yellowish shimmer all over the lid. On top of that I added a yellow-green shimmer on the outer 1/3 and a darker green in the very outer corner and up into the crease into a precise line to avoid smearing and awkward darkness. After that I used a matte shadow one shade lighter than my skin to highlight the brow bone and "erase" any fallout darkness from the dark green. Last I put a pale sheer shimmer in the inner corners for a little brightness. For liner I used a brown cream liner with an angled brush making the thinnest, most precise and close to the lashes line possible. I put a little bit in the outer half of my eye on the bottom and used a smudger/pencil brush to smoke it out on the bottom and make it less harsh. Lastly I used my black liner pencil (any darker color will do though), swirled it in the brown cream liner and applied it to my waterline, just using the pencil as a precise applicator,not actually for its color. I finished off with two coats of Falsies black mascara. This can be paired with a darker, fall-y lip or if you're not confident with darker lip color, a nude gloss on top of a nude lip pencil will do. Don't forget to sculpt those cheeks with a little bronzer well blended so your eyes don't look creepily dark!
Product Pics! (using a much better camera)

Yellow Shimmer (all over lid)

Yellow-Green Shimmer (outer 1/3 of lid, it really is only slightly greener than the yellow)

Dark Green Shimmer (outer corner and crease)

Sheer shimmer (inner corner, its not as yellow as it appears)

Brown Cream Liner

Blush and Bronzer

Main 2 eyeshadow brushes used
Wednesday, October 19, 2011
I Need Your Help!
Hey so this is not exactly makeup related or anything, but it's definitely related to this blog. Basically, no one's gonna see it if no one mentions it to their friends or whoever. I've been posting this blog's link on my Facebook and Twitter as well as in some beauty guru video comment sections. At this pace, no one will ever see this blog beside people I'm friends with on Facebook or my whopping 3 Twitter followers. So, what I'm saying is I REALLY need help spreading the word or this blog will get nowhere and that's not what I want. Thanks to everyone who reads my posts and know that without you guys this blog is nothing but pretty much me talking to myself! Comment, email me, vote in the poll, whatever! I'll even eventually do some guest looks if you want so you can post your looks on my blog and get credit for it if you don't have a blog of your own. Thanks so much :)
~Stephanie
~Stephanie
Tuesday, October 18, 2011
Today's Purchase
So, when it comes to makeup sales, I'm pretty weak. Today I had no intention of makeup shopping but was showing my friend something on Urban Decay's Website and BAM I saw this palette on sale. It includes 6 eyeshadow colors, a black eyeliner and a mini Primer Potion. All this was only $13 and I'd be a fool to miss out on that! So.... in my moment of weakness (like 15 minutes ago!) I bought the palette :) It also comes with a free lipstick sample in the shade Jilted, and I'm a little afraid of the fact that its described as hot pink! Here's a picture of the palette and the sale is still going on now if you're interested.

Honestly, I think the package is pretty awesome too, not to mention the cool eyeshadow colors and the waterproof black liner they say is great for the waterline! I haven't heard great things about the Primer Potion, and that it's too thick, so this is a good way to test it. Tell me if you have this palette and if the colors are good. Also, how is the primer potion and how does it compare to Too Faced Shadow Insurance? (my go-to shadow base!)
Monday, October 17, 2011
Everyday Quick and Easy Eyes
This week is INSANE for me so I can't be spending my life on cool looking eyeshadow and color coordination. Today was a day for the quick, easy, go-to look for me. Basically I have like 4 or 5 different awesome liquid liners from the Sephora brand and I pair that with a simple colored eyeshadow and ignore any shading. It looks nice and takes literally 2 minutes tops.


This is pretty simple looking but the green pairs really nicely with brown eyes, especially for fall :)
Sorry for the lack of picture cropping and quality, this was a quickie post.
I just didn't want to neglect the blog!
These 3 products are really all you need for your eyes to do this. I used Falsies Flared in Blackest Black (not my favorite mascara but my other is at a friend's house!), Urban Decay Cream Shadow in Mushroom and Sephora Liquid Liner in Glitter Green.
Really any colors that look nice together work for this look. I often do a simple shadow with a colored liner for a little pop of color. Typically a neutral brown with any liner works. For a less expensive version of this, Wet and Wild has a few colors of liquid liner that are pretty good. My favorite is the teal-ish color, but I definitely prefer the Sephora because it applies so well! Also, I recommend using a shadow base to make your base color and eyeliner last all day and not melt off your eyes, especially if you have oily skin like me. The U.D. Cream Shadow I used has primer built in, which means one less step in the morning! :)
Sunday, October 16, 2011
Busy Day
So today I was hardly home at all and now its almost 9 on a school night, so no new makeup look today! Instead I can just post some older things I have like good deals on clothes and jewelry I found. TJ Maxx and Marshalls are definitely great places for designer things that cost WAY less.


Betsey Johnson Necklace- these usually sell for at LEAST $55, more often in the 70's!
TJ Maxx, $15 :)

Only $10 at Marshalls!
So tomorrow I'll probably post like my everyday look and the products I use with pictures etc. at least for the eye makeup. Comment on a post if you are following my blog because if no one is there's no point in my talking to myself! :)
Saturday, October 15, 2011
First post!
Hey so I've never had a blog before and have no idea if anyone will even see this! Pretty much I'll be posting makeup pictures, new clothes, awesome deals, etc. Today's makeup, a smoky brown eye inspired by Makeup By Tiffany D on Youtube. Here's the video if you wanna see it :)

side view! (sorry its a bit faded)
andddd here's my makeup today, eyes only!
side view! (sorry its a bit faded)
I can start posting tutorial-like things eventually, but for now I see no point because hardly anyone, if anyone knows about this blog! I'll apologize in advance for any cam quality problems, it's not super high tech. If anyone has cam suggestions feel free :)
Subscribe to:
Posts (Atom)